What Is It Called When You Roll Your Paint Across the Wall Again
Pigment Roller Techniques and Tips
Updated: May nineteen, 2021
Paint faster and smoother with the right rolling techniques

These DIY painting tips will assistance yous curl your walls rapidly and smoothly—without leaving roller marks. Nosotros'll show y'all the tricks and techniques that painting pros apply to get a perfectly painted room. All you need are some basic tools to paint fast, get nifty results and make clean up a breeze. Painting is ane of the least expensive ways to brand over a room, so grab a roller and let's get to work.
Y'all might besides like: TBD
- Fourth dimension
- Complication
- Toll
- A full day
- Beginner
- $51–100
A slightly different arroyo
Load the pigment roller cover with pigment
Load the paint roller cover with paint by dipping into the paint about ane/2 in. and then rolling information technology against the screen. Filling a dry roller cover with pigment volition require five or six repetitions. After that, two or iii dips are all you demand. Leave the roller almost dripping with paint.

A adept paint roller holds the sleeve in place
This paint roller, the Wooster Sherlock, is sturdy and designed to keep the roller comprehend from slipping off while you lot paint.
Most of you have probably used paint rollers earlier, with varying degrees of success. Maybe you just plunged right in and started rolling, developing your own technique as you went. Or peradventure yous read the instructions telling you to apply the paint in some design, usually a "W," earlier rolling information technology out. We're going to show yous a slightly unlike approach. In this commodity, nosotros'll teach you lot a uncomplicated method to quickly spread a smooth, even glaze of latex paint on the wall. Information technology's non fancy, just it gets the job done in record time and eliminates mutual problems similar light areas, roller marks and congenital-upward ridges that sometimes plague first-time painters.
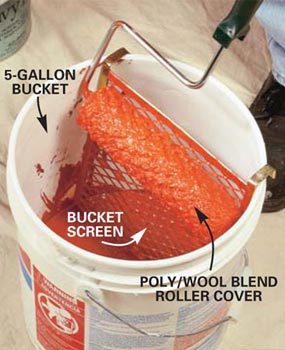
Even so, fifty-fifty the best technique won't work with poor-quality equipment. Don't waste your coin on those all-in-one throwaway roller setups when y'all can buy a pro setup that will last a lifetime. Starting time with a good roller frame. To extend your reach and give y'all better control, screw a 48-in. wood handle onto the end of the paint roller. Y'all could besides use a threaded broom handle. You'll need a container for the paint. While almost homeowners use pigment trays, you'll rarely see a pro using one. That'due south because a 5-gallon bucket with a special bucket screen hung over the border works a lot better.
Here are a few of the advantages of a saucepan and screen over a paint roller pan:
- It's piece of cake to motion the bucket without spilling
- The bucket holds more paint. You won't take to frequently refill a pan.
- Yous're less probable to trip over or footstep in a bucket of paint.
- It's quicker and easier to load the paint roller encompass with paint from a saucepan.
- It's piece of cake to embrace a bucket with a clammy cloth to prevent the pigment from drying out while y'all're taking a lunch break.
Use an old drywall compound bucket or purchase a make clean new saucepan. Add bucket screen and you're gear up to go.
How to properly pigment a wall

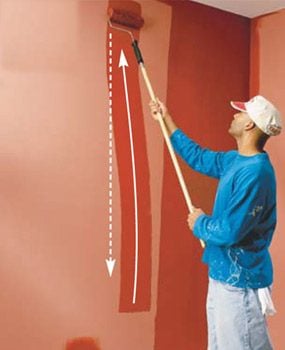
Photograph 1: Gyre pigment on the wall
Lay the pigment on the wall with a sweeping stroke. Start about a foot from the lesser and half dozen in. from the corner and scroll upwardly at a slight angle using light force per unit area. Terminate a few inches from the ceiling. Now ringlet up and downwards back toward the corner to speedily spread the pigment. You can get out paint buildup and roller marks at this stride. Don't worry about a perfect job yet.
Photograph ii: Reload the paint roller and go on rolling
Reload the roller and repeat the process in the adjacent space, working dorsum toward the painted surface area.
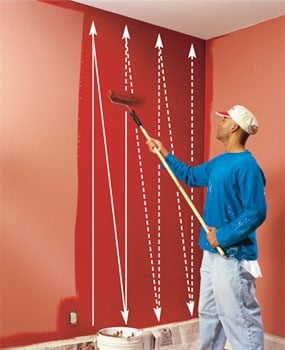
Photo 3: Back roll the unabridged area
Coil dorsum over the entire area you lot've covered to smooth and blend the paint. Don't reload the roller with paint for this step. Employ very light pressure.
Whorl upwards and down, from floor to ceiling and motility over about three-quarters of a roller width each time so y'all're ever slightly overlapping the previous stroke. When you reach the corner, whorl as close as you can to the next wall without touching it. Repeat Steps 1 through 3 until the entire wall is painted.
Take a wool-blend roller cover for a spin
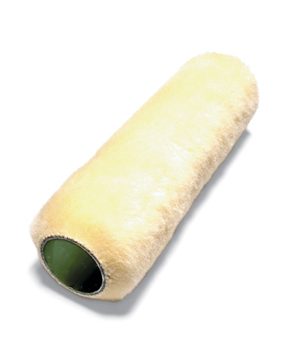
Use a quality roller sleeve
A skillful roller cover is the most important part of your rolling setup.
The most important part of your paint rolling setup is the roller cover, also known equally a sleeve. It's tempting to buy the cheapest encompass available and throw information technology away when y'all're washed. Just you won't heed the few extra minutes of cleanup time once you experience the departure a adept roller cover makes. Cheap roller covers don't hold plenty paint to do a proficient job. It'll take you lot 4 times as long to paint a room. And you'll likely terminate upwards with an inconsistent layer of paint, lap marks and built-upward ridges of paint.
Instead, purchase a 1/2-in. nap wool blend roller embrace and requite it a try. (I good i is the Sherwin-Williams Poly/Wool cover, which is a combination of polyester for ease of employ and wool for maximum paint capacity.) With proper intendance, this may exist the concluding roller comprehend you'll ever buy.
Wool covers exercise accept a few drawbacks, though. They tend to shed fibers when they're offset used. To minimize shedding, wrap the new roller cover with masking tape and peel information technology off to remove loose fibers. Repeat this a few times. Wool covers also tend to get matted down if you apply too much force per unit area while painting. Rolling demands a light affect. No matter what roller embrace you're using, always let the pigment exercise the piece of work. Keep the roller cover loaded with paint and utilise only enough pressure to release and spread the paint. Pushing on the roller to squeeze out the terminal drop of pigment volition only crusade problems.
Video: Best Paint-Rolling Tools
Tips for a perfect paint job

Smooth the paint
Smooth the pigment along the ceiling using a long horizontal stroke without reloading the roller with paint. If you are skilled plenty to roll within an inch of the ceiling while rolling vertically, you lot tin skip this pace.

Lay paint on the wall
Lay paint on wall areas above and beneath windows and doors with a long horizontal stroke. So polish it off with brusque vertical strokes so the texture volition friction match the rest of the wall.
Continue a moisture border. Keeping a wet border is crucial to all acme-quality paint jobs, whether you're enameling a door, varnishing piece of furniture or rolling pigment on a wall. The idea is to plan the sequence of work and work fast enough and so that you're e'er lapping newly applied paint onto pigment that's still wet. If y'all stop for a break in the centre of a wall, for example, and then kickoff painting after this section has dried, you lot'll likely meet a lap marker where the 2 areas join. The rolling technique we show avoids this problem past allowing y'all to apace cover a big area with paint and then return to polish it out—which brings united states to the second important painting technique.
Lay it on, smooth it off. The biggest mistake nearly beginning painters make, whether they're brushing or rolling, is taking as well long to apply the paint. Photograph ane shows how to lay on the pigment. Then apace spread it out and repeat the laying-on procedure again (Photo 2). This will only piece of work with a good-quality roller cover that holds a lot of paint. Until you're comfy with the technique and get a experience for how quickly the paint is drying, encompass only about 3 or 4 ft. of wall before smoothing the whole expanse off (Photo 3). If yous find the paint is drying slowly, you can cover an entire wall earlier smoothing it off.
Get as close as you lot tin. Since rollers can't get tight to edges, the first painting step is to brush along the ceiling, inside corners and moldings. This "cutting in" procedure leaves brush marks that won't match the roller texture on the balance of the wall. For the all-time looking task, yous'll want to cover every bit many castor marks every bit possible with the roller. Do this past advisedly rolling up shut to within corners, moldings and the ceiling. Face the open up end of the roller toward the border and remember not to use a roller that'south fully loaded with pigment. With do, you'll exist able to get within an inch of the ceiling rolling vertically, and can avoid itch up on a ladder to paint horizontally like we show above.
Pick out the lumps before they dry out. It's inevitable that you'll end upwardly with an occasional lump in your paint. Proceed the roller encompass abroad from the flooring where information technology might pick up $.25 of debris that are afterwards spread confronting the wall. Drying bits of paint from the edge of the bucket or bucket screen can also crusade this trouble. Embrace the bucket with a damp cloth when you're not using it. If partially dried paint is sloughing off the screen, take it out and clean it. Keep a wet rag in your pocket and pick lumps off the wall equally yous get. Strain used paint through a mesh pigment strainer to remove lumps.
Scrape excess paint from the roller earlier you wash information technology. Use your putty knife, or meliorate yet, a special roller-scraping tool with a semicircular cutout in the blade. Then rinse the roller encompass until the water runs articulate. A roller and paint brush spinning tool simplifies the cleaning task. Just sideslip the roller encompass onto the spinner and repeatedly wet and spin out the roller until it's clean.
How to Properly Paint a Wall: The Best Coat of Paint Tin can't Hibernate Bumpy Walls
Fill holes with lightweight spackling compound and sand them polish when information technology dries. Then go over the entire wall with 100-dust sandpaper mounted in a drywall sanding handle. The ultimate setup for this job is a pole-mounted drywall sander with a 100-dust mesh drywall sanding screen, but any method of sanding off one-time paint lumps and bumps will do. Next mask off the baseboard and window and door trim. Slide the bract of a flexible putty knife along the edge of the masking tape to seal it. Otherwise paint volition bleed underneath.
How to Properly Paint a Wall: Avert Fat Edges and Roller Marks
Ridges of paint left past the border of the roller, or "fat edges," are a common problem. And if left to dry, they can be difficult to go rid of without heavy sanding or patching. Here are a few ways to avoid the problem:
- Don't submerge the roller in the pigment to load information technology. Paint can seep inside the roller cover and leak out while you lot're rolling. Try to dip merely the nap. And then spin it against the screen and dip again until it'southward loaded with paint.
- Don't printing too difficult when yous're smoothing out the pigment.
- Never start confronting an edge, like a corner or molding, with a full roller of pigment. You'll leave a heavy buildup of paint that can't be spread out. Starting most 6 in. from the edge, unload the paint from the roller. So work back toward the edge.
- Unload excess paint from the open end of the roller before yous scroll dorsum over the wall to shine it out. Do this by tilting the roller and applying a petty actress pressure level to the open up side of the roller while rolling it upwardly and down in the area yous've but painted.
Required Tools for this Projection
Take the necessary tools for this DIY project lined up before yous start—you'll save time and frustration.
Threaded wooden handle
Required Materials for this Project
Avoid last-infinitesimal shopping trips past having all your materials set ahead of fourth dimension. Here's a listing.
Originally Published: November 14, 2019
Source: https://www.familyhandyman.com/project/paint-roller-techniques-and-tips/
0 Response to "What Is It Called When You Roll Your Paint Across the Wall Again"
Post a Comment